前言
因一次意外,hexo博客源码被删除干净,抽空重新配置hexo并重新写了之前的文章,这里把配置hexo各项功能作个记录。
hexo版本
1 | λ hexo version |
安装next主题
1 | cd hexo |
创建 “关于我” 页面
新建一个 about 页面:
1 | hexo new page "about" |
菜单显示 about 链接,在主题的 _configy.yml 设置中将 menu 中 about 前面的注释去掉即可。
1 | menu: |
创建分类页面
添加一个 分类 页面,并在菜单中显示页面链接。
- 新建一个页面,命名为 categories 。命令如下:
1
hexo new page categories
- 编辑刚新建的页面,将页面的类型设置为
categories,主题将自动为这个页面显示所有分类。注意:如果有启用1
2
3
4title: 分类
date: 2014-12-22 12:39:04
type: "categories"多说或者Disqus评论,默认页面也会带有评论。需要关闭的话,请添加字段comments并将值设置为false,如:在菜单中添加链接。编辑主题的1
2
3
4
5title: 分类
date: 2014-12-22 12:39:04
type: "categories"
comments: false_config.yml,将menu中的categories: /categories注释去掉,如下:1
2
3
4
5menu:
home: /
categories: /categories
archives: /archives
tags: /tags
创建标签云页面
添加一个标签云页面,并在菜单中显示页面链接。
- 新建一个页面,命名为
tags。命令如下:1
hexo new page "tags"
- 编辑刚新建的页面,将页面的类型设置为
tags,主题将自动为这个页面显示标签云。注意:如果有启用1
2
3
4title: All tags
date: 2014-12-22 12:39:04
type: "tags"多说或者Disqus评论,默认页面也会带有评论。需要关闭的话,请添加字段comments并将值设置为false,如:1
2
3
4
5title: All tags
date: 2014-12-22 12:39:04
type: "tags"
comments: false - 在菜单中添加链接。编辑主题的
_config.yml,添加tags到menu中,如下:1
2
3
4menu:
home: /
archives: /archives
tags: /tags
站内搜索功能
1 | npm install hexo-generator-searchdb --save |
打开主题配置文件_config.yml,搜索local_search,其值改为true:
1 | local_search: |
添加头像
把头像图片下载到以下目录:
1 | blog\themes\next\source\images\avatar.jpg |
然后在next主题的——config.yml下面填入url:
1 | avatar: |
本地图片引用
1 | npm install https://github.com/7ym0n/hexo-asset-image --save |
安装成功后,需要在根路径的_config.yml如下配置
1 | post_asset_folder: true |
然后清除hexo缓存
1 | hexo clean |
这样新建的文章会同时自动生成同文章名的文件夹
平时我使用vs code写markdown文档,配合Paste Image插件,只需Ctrl + Alt + V可自动把剪切板的图片复制到同路径的images文件夹下,并在文章中生成图片链接。因hexo只能读取文章同路径下同文章名的文件夹下的文件,需要把images文件夹的所有图片复制到同文章名的文件夹下,然后在文章中把所有images/替换成空即可
示例:
1 | MacGesture2-Publish |
使用来引入logo.jpg
自动部署到github
1 | npm install hexo-deployer-git --save |
然后需要在根路径的_config.yml配置你的git URL
1 | deploy: |
然后使用hexo d命令可部署到github
添加流程图支持
1 | npm install --save hexo-filter-flowchart |
安装成功后,需要在根路径的_config.yml文件添加下列代码
1 | flowchart: |
设置阅读全文按钮
只需在文章中添加<!-- more -->标签就行
1 | 这是摘要 |
草稿功能
新建草稿
1 | hexo new draft <title> |
本机预览草稿
1 | hexo S --draft |
将草稿发布为正式文章
1 | hexo P <filename> |
配置评论功能
最开始是想使用gitalk,但发现gitalk权限过高,并且会泄露client_id和client_secret,所以放弃了,改为使用LiveRe,只需注册后拿到uid再复制到next主题目录下的_config.yml,livere_uid:后填入即可
图片点击预览放大功能
进入主题目录,下载fancybox包:
1 | cd blog\themes\next |
在主题配置文件中启用fancybox:
1 | fancybox: true |
参考:https://github.com/theme-next/theme-next-fancybox3
添加一个二次元人物
效果如下: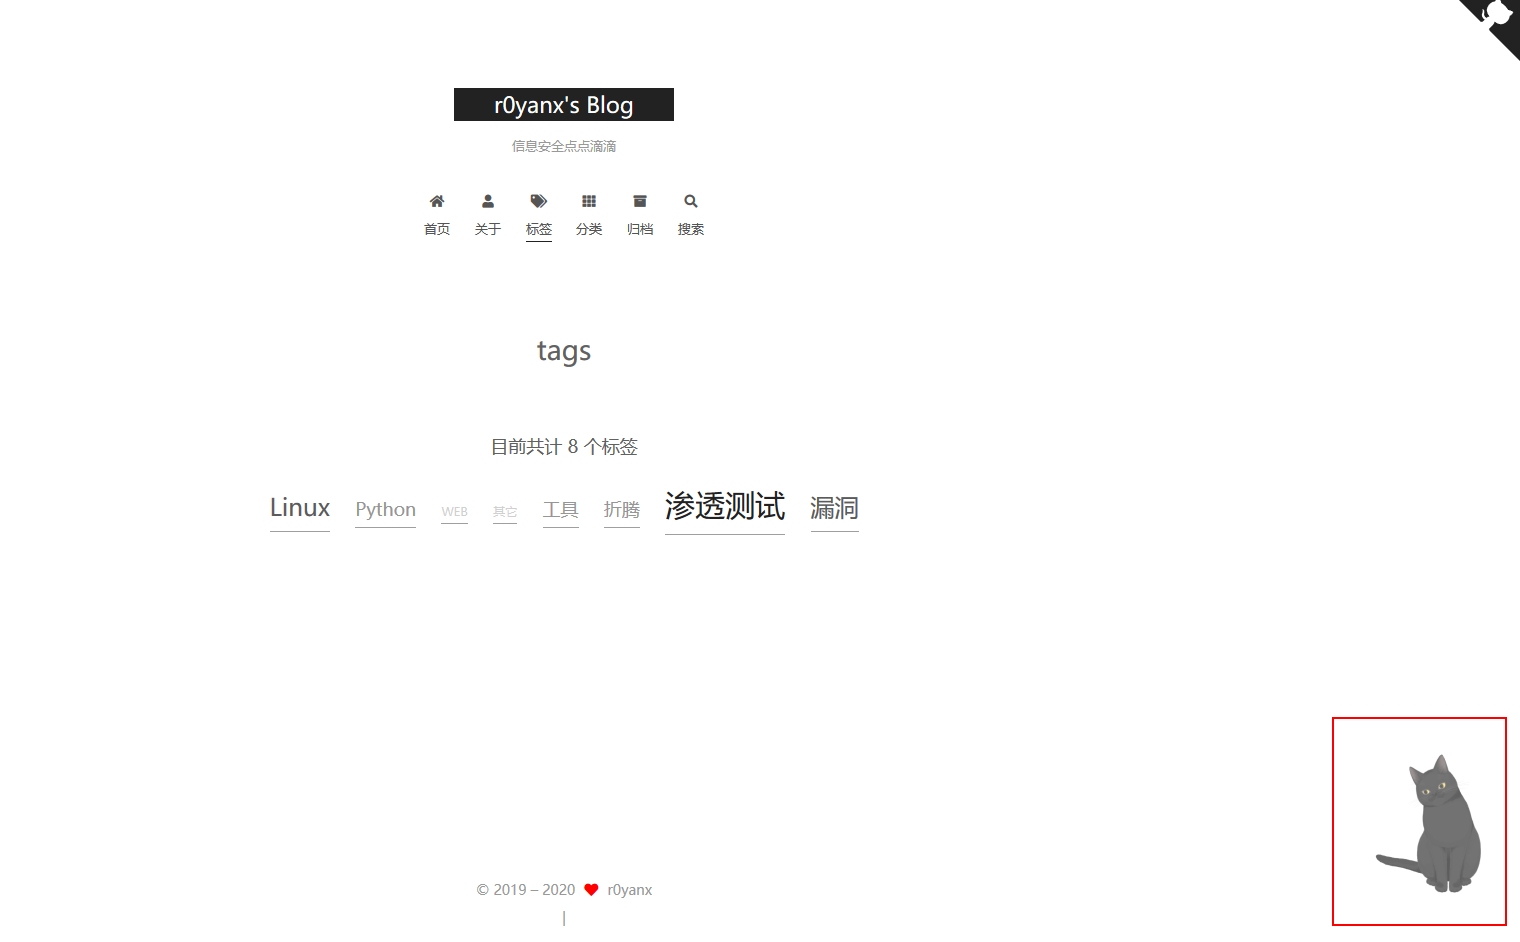
首先安装live2d插件:
1 | npm install --save hexo-helper-live2d |
在Hexo的_config.yml文件中添加下面代码:
1 | live2d: |
选择一个喜欢的模型,从这个url选择:https://huaji8.top/post/live2d-plugin-2.0/
选好模型后根据以下包名安装相应的npm模块:
1 | live2d-widget-model-chitose |
如hijiki对应的是live2d-widget-model-hijiki,然后通过npm install 模型的包名来安装,安装后在_config.yml修改对应的包名来启用:
1 | model: |
添加背景动画
安装动画js依赖:
1 | cd blog\themes\next |
在NexT主题的_config.yml文件启用以下配置:
1 | three_waves: true |
以上三种动画只能选一个:
- three 的动画是线和点的组合,随鼠标位置的移动而变化。
- canvas_nest 是自由移动的线条,当你的鼠标移动时,线条汇聚在你的鼠标位置上,形成多边形。
- canvas_ribbon 是随鼠标点击而变化颜色的彩带。
启用彩虹背景:
1 | canvas_ribbon: |
参考:
https://github.com/theme-next/theme-next-three
https://github.com/theme-next/theme-next-canvas-ribbon
启用顶部的阅读进度条
1 | reading_progress: |
启用页面加载动画
页面加载动画指的是刚访问页面,各元素还没有加载完成时,显示的加载进度动画。NexT 提供了多种样式,读者可以自己尝试。
安装依赖:
1 | cd blog\themes\next |
启用配置:
1 | pace: |
不算子计算不显示的BUG
不算子与hexo-helper-live2d有冲突,经常不显示访问计算,可通过下面的方法修复。
在js目录下创建busuanzi.pure.mini.js文件,内容如下: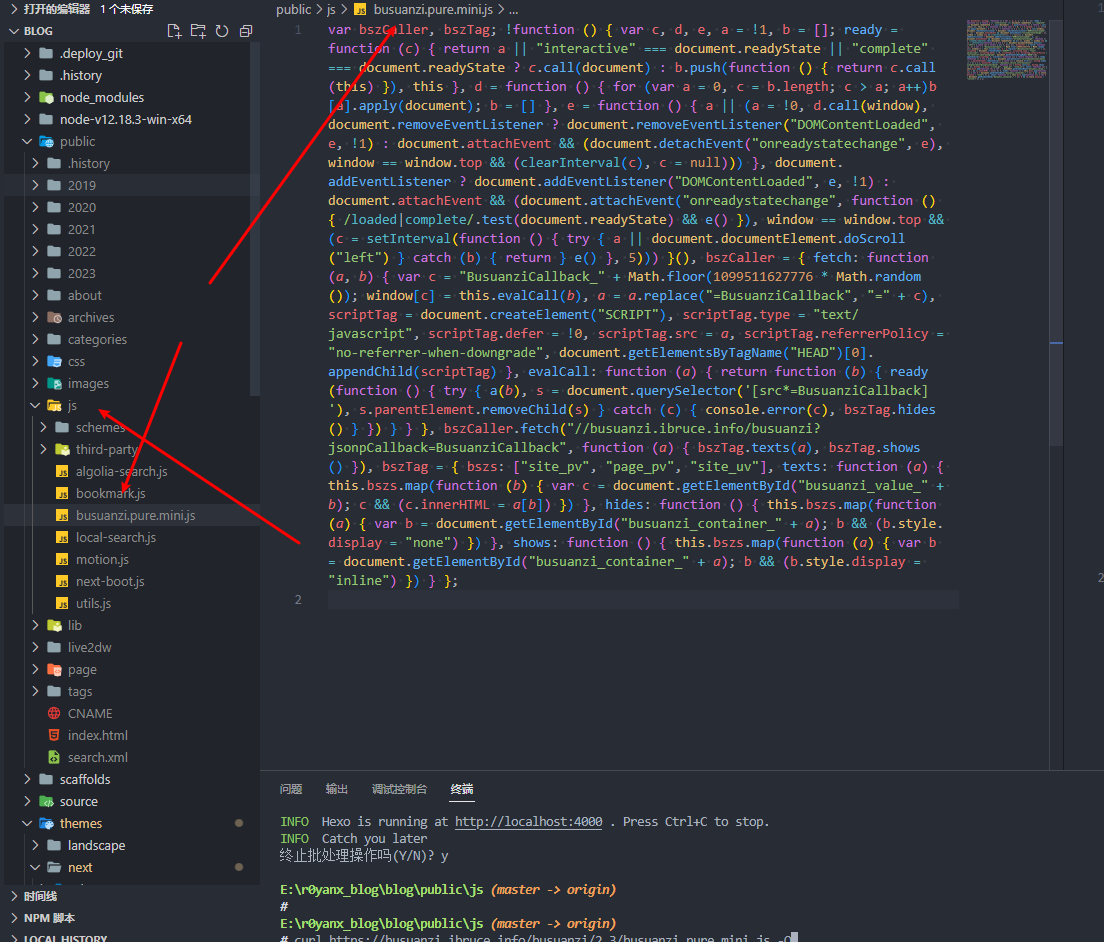
1 | var bszCaller, bszTag; !function () { var c, d, e, a = !1, b = []; ready = function (c) { return a || "interactive" === document.readyState || "complete" === document.readyState ? c.call(document) : b.push(function () { return c.call(this) }), this }, d = function () { for (var a = 0, c = b.length; c > a; a++)b[a].apply(document); b = [] }, e = function () { a || (a = !0, d.call(window), document.removeEventListener ? document.removeEventListener("DOMContentLoaded", e, !1) : document.attachEvent && (document.detachEvent("onreadystatechange", e), window == window.top && (clearInterval(c), c = null))) }, document.addEventListener ? document.addEventListener("DOMContentLoaded", e, !1) : document.attachEvent && (document.attachEvent("onreadystatechange", function () { /loaded|complete/.test(document.readyState) && e() }), window == window.top && (c = setInterval(function () { try { a || document.documentElement.doScroll("left") } catch (b) { return } e() }, 5))) }(), bszCaller = { fetch: function (a, b) { var c = "BusuanziCallback_" + Math.floor(1099511627776 * Math.random()); window[c] = this.evalCall(b), a = a.replace("=BusuanziCallback", "=" + c), scriptTag = document.createElement("SCRIPT"), scriptTag.type = "text/javascript", scriptTag.defer = !0, scriptTag.src = a, scriptTag.referrerPolicy = "no-referrer-when-downgrade", document.getElementsByTagName("HEAD")[0].appendChild(scriptTag) }, evalCall: function (a) { return function (b) { ready(function () { try { a(b), s = document.querySelector('[src*=BusuanziCallback]'), s.parentElement.removeChild(s) } catch (c) { console.error(c), bszTag.hides() } }) } } }, bszCaller.fetch("//busuanzi.ibruce.info/busuanzi?jsonpCallback=BusuanziCallback", function (a) { bszTag.texts(a), bszTag.shows() }), bszTag = { bszs: ["site_pv", "page_pv", "site_uv"], texts: function (a) { this.bszs.map(function (b) { var c = document.getElementById("busuanzi_value_" + b); c && (c.innerHTML = a[b]) }) }, hides: function () { this.bszs.map(function (a) { var b = document.getElementById("busuanzi_container_" + a); b && (b.style.display = "none") }) }, shows: function () { this.bszs.map(function (a) { var b = document.getElementById("busuanzi_container_" + a); b && (b.style.display = "inline") }) } }; |
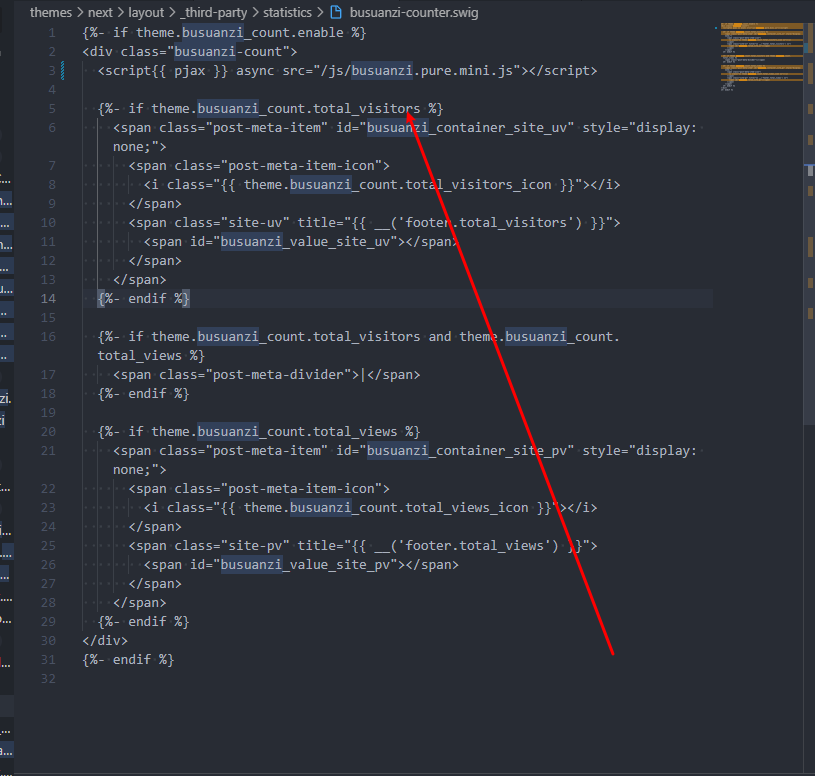
全局搜索busuanzi,找到类似下面代码进行修改。
修改前:
1 | <script async src="//busuanzi.ibruce.info/busuanzi/2.3/busuanzi.pure.mini.js"></script> |
修改后:
1 | <script async src="/js/busuanzi.pure.mini.js"></script> |
参考:
https://ouuan.moe/post/2022/08/busuanzi-and-live2
参考
https://github.com/theme-next/theme-next-pace
https://tding.top/archives/dfac1e9c.html